A hissing toilet tank at 2 AM is the sound of your utility bill ticking upward. According to the EPA WaterSense program, an average household leak can waste up to 10,000 gallons of water every year, and an unsealed tank flapper causes most of that loss.
I learned early in my homeownership years that you do not need an expensive service call for this repair. Knowing how to fix running toilet flapper without plumber bills saves you hundreds of dollars and takes less than fifteen minutes with no specialty tools.
The Silent Leak: Why Your Toilet Flapper Runs Constantly
Gravity-flush toilets work on a straightforward balance of weight, air pressure, and watertight seals. When you depress the flush lever, the trip arm pulls a rubber flap upward. Water rushes through the flush valve into the bowl. As the tank empties, the flapper settles back down, creating a suction seal over the drain orifice so the fill valve can recharge the reservoir.
When that seal fails, water trickles steadily past the rim. The water level drops below the fill line, triggering the float arm to open the fill valve again. This creates the classic “phantom flush” cycle that repeats endlessly.
The Black Residue Test: Chemical Wear vs Mechanical Catch
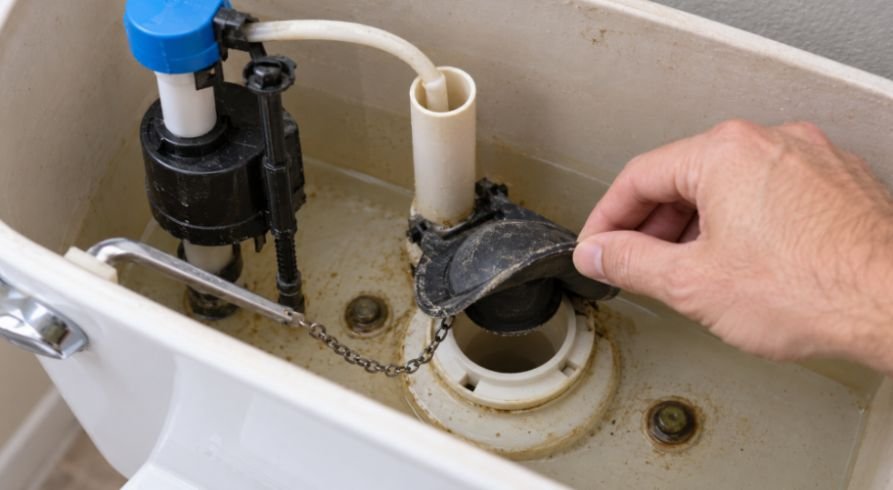
Before you buy a replacement part, isolate why the seal broke. Remove your toilet tank lid and rest it flat on a bath mat so it cannot slide or crack. Reach down and rub your index finger across the top surface of the rubber flap.
If your finger comes away coated in an inky black smudge, municipal chloramines or in-tank drop-in bleach tablets have chemically broken down the polymer. Technical guidance from Fluidmaster confirms that chemical cleaners eat away rubber compounds, warping their flat profile.
A chemical breakdown cannot be scrubbed clean; it requires a replacement flap. If your finger comes back clean, your issue stems from simple mechanical friction or calcium crust along the valve lip.
Essential Tools and Prep Before Touching the Flush Valve
You do not need an open-ended wrench or pipe dope for this project. Grab three items from your utility closet:
- A non-abrasive kitchen sponge or Scotch-Brite pad
- A cup of distilled white vinegar
- A standard flathead screwdriver (rarely needed, but handy for stubborn hinge pins)
Locate the oval shut-off valve on the wall beneath the left side of the tank. Turn the handle clockwise until it seats firmly. If the valve feels frozen, pull slightly outward while turning to avoid stripping the packing nut. Once the supply stops, flush the toilet and hold the handle down for five seconds to drain ninety percent of the reservoir water.
Fixing the Flapper Mechanism Without Buying New Parts
Many running toilets need a minor calibration rather than a trip to the hardware store.
Calibrating Chain Slack and Eliminating Tangling
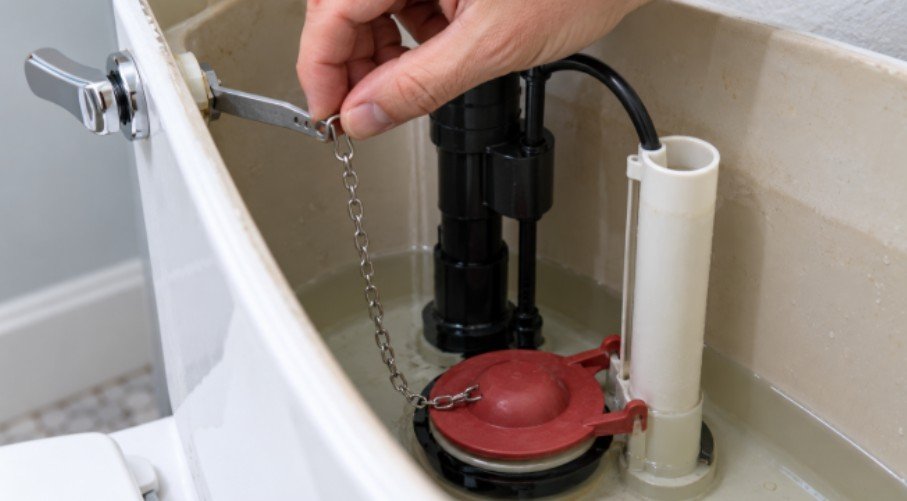
A poorly sized lift chain causes nearly half of all flapper issues. If the chain is too tight, it pulls up on the flapper hinge even when the handle rests horizontally, letting water seep out beneath the lip. If the chain is too loose, the excess links drop underneath the rubber seal as it closes, propping the flapper open.
Unclip the chain from the trip lever arm. Adjust the clip so the chain has roughly one-half inch of slack when the flapper rests flat against the valve seat. Clip the excess links to the side rather than letting them dangle loose. The line should pull straight up without dragging against the overflow pipe.
Scrubbing the Flush Valve Seat to Clear Mineral Scale
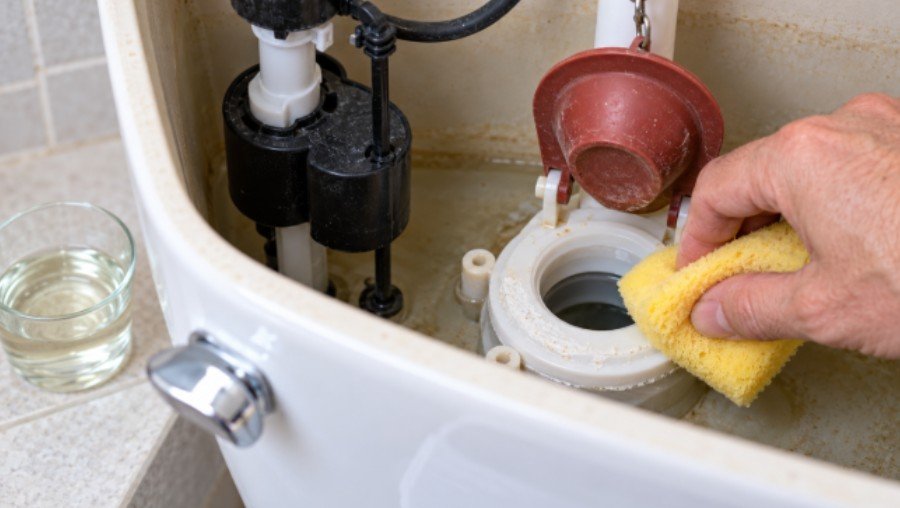
Hard water leaves dissolved calcium and magnesium deposits on the plastic rim beneath the rubber flap. Even a grain-sized deposit will break the vacuum seal.
Distilled white vinegar is also a common ingredient in homemade household cleaning solutions for tackling certain types of mineral buildup and residue. For another practical use of vinegar around the home, see this recipe for DIY vinegar and citrus peel all-purpose cleaner spray.
Lift the flap and pour two tablespoons of distilled white vinegar directly over the hard plastic rim. Let the acid sit for two minutes to soften the scale. Use your damp sponge to scrub the entire circular rim until it feels as smooth as polished glass. Wipe down the underside edge of the rubber flap as well, then lower it into position.
Replacing a Dead Toilet Flapper: Step-by-Step Installation
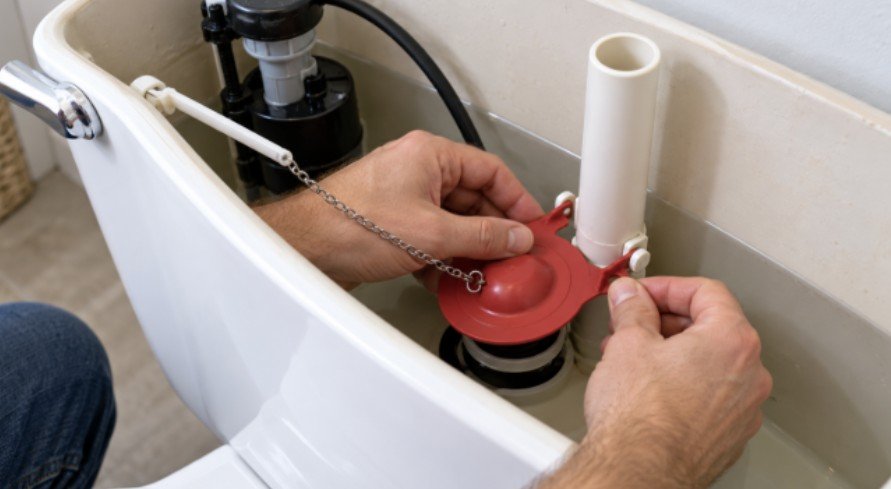
If your rubber failed the residue test or shows visible ripples around its outer skirt, swap it out. The process takes five minutes.
Sizing Your Flush Valve (2-Inch vs 3-Inch Basins)
Modern toilets use different flush valve designs, including standard two-inch valves and larger three-inch valves designed to improve flushing performance. Understanding the differences between common toilet flush valve types can help homeowners identify compatible replacement parts and choose the right option for their toilet.
Measure the inside diameter of the drain hole at the bottom of your tank, or snap the old flap off its pegs and bring it to your local hardware retailer. Do not buy an adjustable dial flapper unless your toilet model specifically calls for variable timing; standard solid-rubber flaps provide a tighter perimeter weight.
Seating the Hinges and Setting the Lift Arm
Unhook the old flapper chain from the flush lever. Gently stretch the two rubber mounting rings away from the small plastic pegs on either side of the vertical overflow tube. Slide the old unit off.
Position the new flapper over the drain. Slide the mounting holes over the plastic pivot pegs until they seat flush against the base. Hook the new chain directly onto the lever arm hole closest to a 90-degree vertical angle. Test the lever by hand before turning the water on; the flap should rise smoothly and drop square into the center of the opening.
The 15-Minute Dye Test to Verify a Watertight Seal
Open the wall shut-off valve counterclockwise and let the tank fill until the float valve shuts off automatically. The water line should stop approximately one inch below the top rim of the overflow pipe.
To verify your seal, turn to the diagnostic procedure endorsed by This Old House: squeeze five drops of dark food coloring or blue leak-detector tablets directly into the tank water. Do not flush. Step away for fifteen minutes. If the water inside your toilet bowl remains clear, your seal is watertight. If color blooms inside the bowl, readjust your chain tension or wipe the seat rim again.
Wrap Up the Wrench: Keep Your Plumbing Cash Where It Belongs
Fixing a failing flush flapper proves that most residential plumbing fixes demand attention to detail rather than expensive trade tools. Taking control of small mechanical faults stops water waste and eliminates the annoyance of constant bathroom hissing. Keep a spare universal flapper in your laundry cabinet, skip the commercial chemical bowl tabs that destroy tank seals, and treat yourself to a nice dinner with the diagnostic fee you just avoided.
Keeping a spare flapper and basic repair tools in one organized place makes future plumbing maintenance easier and faster. For more practical ways to organize household essentials and make better use of available space, explore these DIY storage solutions ideas.
Frequently Asked Questions
1. How long does a standard rubber toilet flapper typically last?
Most rubber flappers last between four and five years, though harsh municipal water or tank-cleaning tablets can degrade them in under two years.
2. What causes a toilet flapper to stay floating upright after flushing?
A flapper sticks upright when its hinge ears bind against the overflow pipe pegs or when the chain snags on the flush lever arm.
3. Can I fix a running toilet flapper without replacing parts?
Yes, unkinking the lift chain to allow a half-inch of slack and wiping mineral deposits off the valve seat often restores a tight seal immediately.
4. Why does my new toilet flapper still leak into the bowl?
A persistent leak after replacement usually indicates you installed a 2-inch flapper on a 3-inch valve seat, or the flush valve seat itself is cracked.